정상혁정상혁

Hadoop의 Map-Reduce처리에서는 DB를 바로 연결해서 처리할 수 있는 DBInputFormat, DBOutputFormat의 클래스가 제공되고 있습니다.

그러나 이 클래스들은 이름이 'DB’가 붙어있는 것이 무색하게 Oracle과 연결해서 사용해보면 에러가 납니다. DBInputFormat에서는 웹에서의 페이지 처리 쿼리처럼 데이터를 잘라서 가지고 오기 위해 원래 쿼리에다 LIMIT와 OFFSET 키워드를 붙이는데, 이 것은 Oracle에서는 지원되지 않습니다. 그리고 DBOutputFormat에서는 insert문의 맨 뒤에 세미콜론(;)을 붙여버리는데, 이것 역시 Oracle의 JDBC를 사용할 때는 에러를 냅니다.

따라서, 결국 이 클래스들을 Oracle에서 쓸 수 있도록 상속해서 구현을 해 줄수 밖에 없었습니다. 얼핏 생각하면 쿼리만 바꾸어주면 되는 것이니 메소드 하나만 오버라이딩 해주면 될 것으로 예상했으나, 원래 클래스들의 구조가 그 정도로 단순하지 않았습니다.Inner클래스가 많아서 여러 클래스와 메서드들을 다 overriding해 줄 수 밖에 없었습니다. 더군다나, 새로 상속한 클래스의 내부에서 꼭 호출해야 하는 DBConfiguration클래스의 생성자가 public이 아닌 package private(아무것도 선언안한 디폴트 접근자)인 탓에, 패키지를 원래의 DBInputFormat, DBOutputFormat와 같은 패키지로 맞추어야 하는 불편함도 있었습니다. protected로 선언된 메소드들이 많은 것보면 분명히 상속해서 덮어쓰라고 만들어놓은 클래스 같은데, 막상 그렇게 활용하기에는 간편하지 않았던 것이죠.

그리고 또 구조적으로 아쉬운 점은 두 클래스가 같은 DBConfiguration을 보게 있어서 Map에서 입력자료를 얻어오는 DB와 Reduce에서 쓰는 DB가 다를 때는 다시 별도의 클래스를 만들어주어야 한다는 것입니다.

Spring Batch에서도 JdbcPagingItemReader라는 약간 유사한 클래스가 있습니다. DBInputFormat이 하나의 쿼리에서 가지고 올 데이터를 동시에 여러번 쿼리해서 나누어 가지고 오는 반면에 JdbcPagingItemReader에서는 부분씩 가지고 오더라도 순차적으로 쿼리를 하는 차이점이 있기는 합니다. 그래도, 페이지 처리 쿼리처럼, 데이터를 나누어서 가지고 오는 쿼리를 제공한다는 점에서는 유사합니다. JdbcPagingItemReader에서는 내부적으로 PagingQueryProvider 라는 인터페이스를 사용하게 되어 있고, 이 인터페이스는 각 DB종류별로 OraclePagingQueryProvider, HsqlPagingQueryProvider, MySqlPagingQueryProvider, SqlServerPagingQueryProvider, SybasePagingQueryProvider 등의 구현클래스를 가지고 있습니다. Hadoop의 DBInputFormat도 이런 구조였다면 이를 응용하려는 개발자가 훨씬 쉽게 클래스 확장방법을 이해했을 것입니다.

아뭏든 지금까지 현재 공개된 API만으로는 Hadoop의 DB연결 지원 클래스들은 빈약해 보이고, API도 좋은 설계요건을 갖추었다고 느껴지지는 않습니다. 아무래도 포털 등에서 대용량 데이터를 처리하는 곳에 쓰이다보니 DB와 함께 연결되는 쓰임새가 그리 많지는 않았나봅니다. 더군다나 Oracle에서는 한번도 안 돌려본 클래스가 버젓이 DB…​로 시작되는 이름으로 들어간 것 보면 Oracle이 쓰이는 동네와 Hadoop이 사는 곳은 아주 멀리 떨어져 있었던 것 같습니다. 그러나, 앞으로 엔터프라이즈 환경에서도 Hadoop이 쓰이려면 DB와의 integration은 반드시 거쳐야할 다리인 것 같습니다. Enterprise 시장에서의 mapreduce 링크를 보아도 이미 그런 시도들이 시작된 것을 알 수 있습니다.

한편, Hadoop의 FileInputFormat가 Spring batch의 FlatFileItemReader와 유사한 것 등이나 Spring batch도 2.0에서 아직 분산, 동시처리 등을 지원하기 시작했다는 점은 두 프레임웍의 겹치는 지점이 늘어날 수도 있다는 생각도 듭니다. 뭐 아직 Spring batch의 분산지원은 걸음마 단계이기는 합니다만, DB에서 HDFS에 들어가는 파일을 쓸 때 Spring batch의 API를 활용하는 것 깉은 활용법은 시도해 볼만하다고 생각됩니다.

소스

OracleInputFormat
package org.apache.hadoop.mapred.lib.db;

import java.io.IOException;
import java.sql.SQLException;

import org.apache.hadoop.io.LongWritable;
import org.apache.hadoop.mapred.InputSplit;
import org.apache.hadoop.mapred.JobConf;
import org.apache.hadoop.mapred.RecordReader;
import org.apache.hadoop.mapred.Reporter;

public class OracleInputFormat<T extends DBWritable> extends DBInputFormat<T>{

    private DBConfiguration dbConf = null;
    private DBInputSplit split;

    @Override
    public RecordReader<LongWritable,T> getRecordReader(InputSplit split, JobConf job,
            Reporter reporter) throws IOException {
        dbConf = new DBConfiguration(job);
        this.split = (DBInputSplit)split;

        @SuppressWarnings("unchecked")
        Class inputClass = dbConf.getInputClass();
        try {
            @SuppressWarnings("unchecked")
            RecordReader<LongWritable,T> reader = new OracleRecordReader((DBInputSplit) split, inputClass, job);
            return reader;
        } catch (SQLException ex) {
            throw new IOException(ex.getMessage());
        }
    }

    public static void setInput(JobConf job, Class<? extends DBWritable> inputClass,
              String inputQuery, String inputCountQuery) {
        DBInputFormat.setInput(job, inputClass, inputQuery, inputCountQuery);
        job.setInputFormat(OracleInputFormat.class);
     }

    protected class OracleRecordReader extends DBRecordReader{
        protected OracleRecordReader(DBInputSplit split, Class<T> inputClass,
                JobConf conf) throws SQLException {
            super(split, inputClass, conf);
        }

        @Override
        protected String getSelectQuery() {
            long length = 0;
            long start = 0;
            try{
                length = split.getLength();
                start = split.getStart();
            } catch(IOException e){
                throw new IllegalArgumentException
                        ("cannot read length or start variable from DBInputSplit",e);
            }
            StringBuilder query = new StringBuilder();
            query.append(" SELECT * \r\n");
            query.append(" FROM (SELECT m.* , ROWNUM rno ");
            query.append("       FROM ( ");
            query.append(              dbConf.getInputQuery());
            query.append("             )  m");
            query.append("       WHERE ROWNUM <= " + start + " + " + length + ")");
            query.append(" WHERE RNO > " + start);
            System.out.println(query.toString());
            return query.toString();
        }
    }
}
OracleOutputFormat
package org.apache.hadoop.mapred.lib.db;
import org.apache.hadoop.mapred.JobConf;

public class OracleOutputFormat<K  extends DBWritable, V> extends DBOutputFormat<DBWritable, V>{
    @Override
    protected String constructQuery(String table, String[] fieldNames) {
            if(fieldNames == null) {
              throw new IllegalArgumentException("Field names may not be null");
            }
            StringBuilder query = new StringBuilder();
            query.append("INSERT INTO ").append(table);

            if (fieldNames.length > 0 && fieldNames[0] != null) {
              query.append(" (");
              for (int i = 0; i < fieldNames.length; i++) {
                query.append(fieldNames[i]);
                if (i != fieldNames.length - 1) {
                  query.append(",");
                }
              }
              query.append(")");
            }
            query.append(" VALUES (");

            for (int i = 0; i < fieldNames.length; i++) {
              query.append("?");
              if(i != fieldNames.length - 1) {
                query.append(",");
              }
            }
            query.append(")");
            return query.toString();
          }
    public static void setOutput(JobConf job, String tableName, String... fieldNames) {
        DBOutputFormat.setOutput(job, tableName, fieldNames);
        job.setOutputFormat(OracleOutputFormat.class);
    }
}
Job 구성 예
public class SampleJob {

    public static void main(String args[]) throws IOException, URISyntaxException{
        JobConf conf = new JobConf(SampleJob.class);
        initClasspath(conf);
        conf.setJobName("sampleJob");
        DBConfiguration.configureDB(conf, "oracle.jdbc.driver.OracleDriver",
                "jdbc:oracle:thin:@localhost:1525:TEST",
                "myuser", "mypassword");
        OracleInputFormat.setInput(conf, Query.class,
                "SELECT query, category, user_id FROM query_log ",
                "SELECT COUNT(*) FROM query_log");
        conf.setOutputKeyClass(Query.class);
        conf.setOutputValueClass(IntWritable.class);
        conf.setMapperClass(SampleMapper.class);
        conf.setReducerClass(SampleReducer.class);
        conf.setCombinerClass(SampleReducer.class);
        OracleOutputFormat.setOutput(conf, "category", "user_id","cnt");

        JobClient.runJob(conf);
    }

    private static void initClasspath(JobConf conf) throws URISyntaxException,
            IOException {
        DistributedCache.addCacheFile(new URI("lib/ojdbc5-11.1.0.6.jar"), conf);
        DistributedCache.addFileToClassPath(new Path("lib/ojdbc5-11.1.0.6.jar"), conf);
    }
}
정상혁정상혁

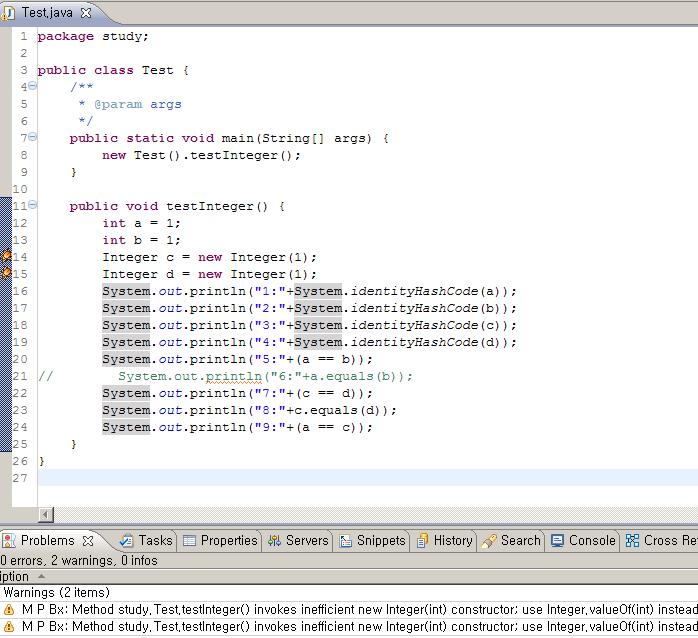
아래 코드는 [프리미티브 타입과 Wrapper 클래스, 자동 Boxing, 자동 UnBoxing]이라는 글에 나오는 것을 입력해 본 것입니다. int와 java.lang.Integer객체를 "=="와 "equals()"메소드로 비교하고 있습니다.

auto boxing test

위의 코드에서 생성한 .class파일을 역컴파일해보면 아래와 같은 코드가 나옵니다. autoboxing과 unboxing이 어떤 방식으로 이루어 지는지 잘 확인할 수 있습니다. java.lang.Integer가 int로 바뀔 때는 intValue() 메소드, int가 java.lang.Integer로 바뀔 때는 Integer.valueOf()메소드를 사용하고 있습니다. JDK 1.4이하 버전과의 하위호환성을 위해서 이런 방식을 쓰는 것이겠죠.

int a = 1;
int b = 1;
Integer c = new Integer(1);
Integer d = new Integer(1);
System.out.println((new StringBuilder("1:")).append(System.identityHashCode(Integer.valueOf(a))).toString());
System.out.println((new StringBuilder("2:")).append(System.identityHashCode(Integer.valueOf(b))).toString());
System.out.println((new StringBuilder("3:")).append(System.identityHashCode(c)).toString());
System.out.println((new StringBuilder("4:")).append(System.identityHashCode(d)).toString());
System.out.println((new StringBuilder("5:")).append(a == b).toString());
System.out.println((new StringBuilder("7:")).append(c == d).toString());
System.out.println((new StringBuilder("8:")).append(c.equals(d)).toString());
System.out.println((new StringBuilder("9:")).append(a == c.intValue()).toString());

new Integer() 로 생성자를 호출하면 매로 새로 객체를 생성하는데, Integer.valueOf()메소드를 사용하면 캐쉬된 값을 사용할 수 있습니다. 이 메소드의 소스를 보면 -128부터 127까지의 static영역에 캐쉬로 쌓아두고 있습니다.

 static {
  cache = new Integer[256];
  for (int i = 0; i < cache.length; i++)
  cache[i] = new Integer(i - 128);
}

public static Integer valueOf(int i) {
  if (i >= -128 && i <= 127)
  return IntegerCache.cache[i + 128];
  else
  return new Integer(i);
}
---

처음에 나왔던 저의 Eclipse 캡쳐화면을 보면 findbugs 플러그인에서 new Integer()사용 코드에 대한 경고를 보여주고 있습니다. 자세한 설명을 보니, `Integer.valueOf()` 를 사용할 경우 약 3.5배 정도 실행속도가 빠르다고 하네요.

M P Bx] Method invokes inefficient Number constructor; use static valueOf instead [DM_NUMBER_CTOR]

Using new Integer(int) is guaranteed to always result in a new object whereas Integer.valueOf(int) allows caching of values to be done by the compiler, class library, or JVM. Using of cached values avoids object allocation and the code will be faster.

Values between -128 and 127 are guaranteed to have corresponding cached instances and using valueOf is approximately 3.5 times faster than using constructor. For values outside the constant range the performance of both styles is the same.

Unless the class must be compatible with JVMs predating Java 1.5, use either autoboxing or the valueOf() method when creating instances of Long, Integer, Short, Character, and Byte.

이런 원리들을 잘 염두해 둬서, auto boxing과 unboxing이 사용될 때 필요없는 객체가 생성되지 않는지 유의해야 합니다.

다음 코드는 Effective Java 2nd Edition의 Item 5 - '불필요한 객체를 생성하지 마라'에 나오는 예제입니다.

[source,java]

Long sum = 0L; for(long i=0;i< Integer.MAX_VALUE;i++){ sum += i; } System.out.println(sum);

  이 코드를 컴파일한 후 다시 역컴파일 해보면 다음과 같이 나옵니다.

[source,java]

Long sum = Long.valueOf(0L); for(long i = 0L; i < 0x7fffffffL; i++) sum = Long.valueOf(sum.longValue() + i);

System.out.println(sum);

java.lang.Double.valueOf(double) 메서드는 매번 새로운 객체를 생성하게 되어 있습니다.

[source,java]

public static Double valueOf(double d) { return new Double(d); }

이렇듯 불필요한 객체생성을 막기 위해 되도록 primitive type을 선호해야 합니다. auto boxing은 Collection이나 Map에 들어가는 요소로 변수가 쓰일 때, generics가 적용한 코드를 작성할 때 등이 적절한 사용의 예입니다. (Effective Java 2nd Edition, Item 49 참조)
정상혁정상혁

간단한 파일 업로드 기능을 만들어야 할 일이 생겨서, Spring 2.5의 annotation을 이용한 Action에서 이를 처리하게 했습니다. 실무에서 썼던 것을 더 단순한 예제로 재구성해서 정리해봅니다.

Maven의 pom.xml에 파일업로드 기능에서 참조하는 commons-fileupload 라이브러리에 대한 dependency를 추가합니다.

<dependency>
   <groupId>commons-fileupload</groupId>
   <artifactId>commons-fileupload</artifactId>
   <version>1.2.1</version>

</dependency>

web.xml에는 applicationContext 파일의 위치를 지정하고, *.do를 스프링에서 처리하도록 설정합니다.

<servlet>
   <servlet-name>dispatcher</servlet-name>
   <servlet-class>org.springframework.web.servlet.DispatcherServlet</servlet-class>
   <init-param>
     <param-name>contextConfigLocation</param-name>
     <param-value>classpath:applicationContext.xml</param-value>
   </init-param>
   </servlet>
   <servlet-mapping>
     <servlet-name>dispatcher</servlet-name>
     <url-pattern>*.do</url-pattern>
   </servlet-mapping>

업로드 기능을 간단히 테스트할 수 있는 jsp페이지를 만들어봅니다. 단순히 파일 1개를 "file"이라는 변수명으로 업로드 요청을 하는 페이지입니다.

<%@ page language="java" contentType="text/html; charset=UTF-8"
    pageEncoding="UTF-8"%>
<%@ taglib prefix="spring" uri="http://www.springframework.org/tags"%>
<%@ taglib prefix="form" uri="http://www.springframework.org/tags/form"%>
<html>
<head>
    <meta http-equiv="Content-Type" content="text/html; charset=UTF-8">
    <title>업로드 테스트</title>
</head>
<body>
<form action="/study/upload.do" method="post" enctype="multipart/form-data">
<p>
    <label for="file">파일1 </label>
    <input type="file" name="file">
</p>
<p>
    <input type="submit" value="전송"/>
</p>
</form>
</body>
</html>

그리고 applicationContext파일을 아래와 같이 선언합니다. DefaultAnnotationHandlerMapping 을 이용해서 annotation을 이용한 Controller 설정을가능하게 합니다. <context:component-scan/> 태그를 사용해서, 설정을 scan할 패키지를지정합니다. 그리고, 파일이 저장될 디렉토리는 ${repository.path} 속성으로 표시했습니다. Maven의 resource filter기능을 이용해서 실행환경에 따라 다른 값을 넣게 하면 편리합니다.

<?xml version="1.0" encoding="UTF-8"?>
<beans xmlns="http://www.springframework.org/schema/beans"
    xmlns:xsi="http://www.w3.org/2001/XMLSchema-instance"
    xmlns:context="http://www.springframework.org/schema/context"
    xsi:schemaLocation="http://www.springframework.org/schema/beans http://www.springframework.org/schema/beans/spring-beans.xsd
        http://www.springframework.org/schema/context http://www.springframework.org/schema/context/spring-context.xsd">

    <bean  class="org.springframework.web.servlet.mvc.annotation.DefaultAnnotationHandlerMapping">
        <property name="alwaysUseFullPath" value="true"/>
    </bean>
    <bean id="multipartResolver"
        class="org.springframework.web.multipart.commons.CommonsMultipartResolver"/>

    <bean id="respository" class="study.repository.FileRepository">
        <constructor-arg value="${repository.path}" />
    </bean>
    <context:component-scan    base-package="study.action"/>
</beans>

실제적인 파일의 저장기능을 담당하는 클래스인 FileRepository에서는 간단하게 UIDD를 이용해서 키를 생성하고 path필드로 지정된 디렉토리에 저장을 해줍니다.

package study.repository;

import java.io.File;
import java.io.IOException;
import java.util.UUID;

import org.springframework.web.multipart.MultipartFile;

public class FileRepository {
    private String path;
    public FileRepository(String path) {
        this.path = path;
        File saveFolder = new File(path);
        if(!saveFolder.exists() || saveFolder.isFile()){
            saveFolder.mkdirs();
        }
    }

    public String saveFile(MultipartFile sourcefile) throws IOException{
        if ((sourcefile==null)||(sourcefile.isEmpty())) return null;
        String key = UUID.randomUUID().toString();
        String targetFilePath = path+"/"+ key;
        sourcefile.transferTo(new File(targetFilePath));
        return key;
    }
}

추가적으로 키값을 넣어주면 파일을 반환해주는 메소드나, 파일의 종류나 날짜에 따라서 하위 디렉토리를 구분해서 생성하는 기능도 넣을 수있을 것입니다. 그리고 더 확장한다면, 따로 주요 메서드를 선언한 Repository 라는 인터페이스를 정의하고, DB를저장소로 활용하는 DbRepository 와 같이 이름 붙인 구현 클래스도 만들어 볼 수 있겠습니다.

그리고 @Controller , @RequestMapping, @RequestParam, @Autowired의 Anntation을활용해서 Controller 클래스를 작성합니다. 업로드 후 화면에 키값만 뿌도록 해서 java.io.Writer클래스를 화면출력을 위해 사용했습니다.

package study.action;

import java.io.IOException;
import java.io.Writer;
import org.springframework.beans.factory.annotation.Autowired;
import org.springframework.stereotype.Controller;
import org.springframework.web.bind.annotation.RequestMapping;
import org.springframework.web.bind.annotation.RequestParam;
import org.springframework.web.multipart.MultipartFile;

import study.repository.FileRepository;

@Controller
public class FileAction {
     private FileRepository respository;

    @Autowired
    public void setRespository(FileRepository respository) {
        this.respository = respository;
    }
    @RequestMapping("/upload.do")
    public void execute(@RequestParam("file") MultipartFile file,
            Writer out) throws IOException{
        String key = respository.saveFile(file);
        out.write(key);
    }
}

MultipartFile 클래스를 파라미터로 받는 메서드는 MockMultiPartFile를 이용해서 테스트하면 됩니다.

참고로 최근 로드존슨이 인터뷰에서 한 말에 따르면 기존 Spring MVC의 Controller interface는 삭제될 것이라고 하네요.